count tutorial. It is in fact just a few examples how program's options can affect the number of counted cells.
Program should be invoked from the command line. If you do not know what is the command line, I cannot help you much. Try G
Under Linux or Mac you
should run a program called Konsole
, under Windows go to the Menu Start, find Run
and type cmd. In
both cases a window will appear, and this is the place where you can type some commands. What commands? - this is beyond the scope
of this tutorial, see Download and Installation for more details. But to run the program count,
you will always need to write:
> count.exe OPTIONS FILES
where FILES is one or more BMP files (with an extension *.bmp). To specify a single file, just type its name. To process more than one file,
you can either type their names separated by spaces, or type something like *.bmp which means that all BMP files in the
current directory shall be analyzed.
OPTIONS means one or more of the following options, all separated by spaces
-b NUM sets the background level to NUM, range 10...250 (default: 60). This option allows to remove the photo background,
usually caused by some non-specific staining.
-S NUM sets the cutoff for the spot size to NUM. The value NUM is measured in pixels and has the meaning of the smallest
bright spot on the picture at the preprocessing stage, which is taken for subsequent calculations (separation of cells and counting). It is not the smallest cell size
- it would be so only if all cells were separated.
-D NUM gives the minimal distance between cells, measured in pixels. If some cell centers lie closer that NUM, they are
merged together at the final stage of the processing, and counted as a single cell.
-m MODE tells which channel should be counted. The following numbers are allowed: 1=red, 2=green, 4=blue, 3=yellow (red&green),
5=purple (red&blue), 6=navy (green&blue), 7=all channels (gray).
-i make a histogram: number of cells versus their brightness. Normally it is disabled. The histogram is saved to a file
starting with _, then goes the name of the picture followed by
.dat. It consists of two columns: brightness and the number of cells, separated by TAB.
-w NUM gives explicitely the average diameter of cell in pixels
- normally it is calculated by the program during some preprocessing and used for counting cells. Sometimes it helps to change it
(see examples below).
Now some more options, but not very useful:
-s NUM like -S, but the value NUM is measured in terms of the average diameter, and hence is related to
the value given with the parameter -w. Default: 0.5.
-d NUM like -D, but again it is a relative value to the average diameter. Default: 0.3.
-p NUM isolation factor, controls the width of the function used for blurring the picture. Default value: 1. Use it only occasionally, when other options fail.
All these options can be listed by typing count.exe -help .
Let us start with an example of a very good staining of nuclei in dorsal spinal cord,
shown already in How does it work section.
When we invoke the program without any options (only
the filename is given):
> count.exe pic1.bmp
the following message will be displayed:
PROGRAM count: which channel? (7=all, +1=r,+2=g,+4=b)
and the execution stops until the user will type something.
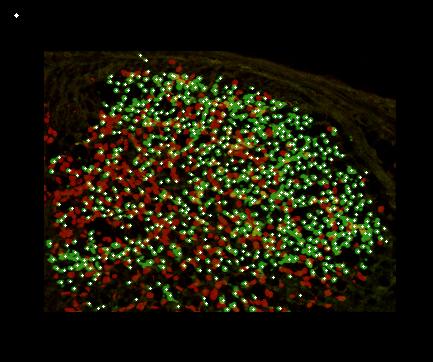
The program asks which channel should be analyzed. To have only green channel, type 2 and press Enter. If we would like to count cells
which are simultaneously green and red, we should type 3 (because it is 1+2). Similarly, it should be 6 for green-blue cells (2+4).
If we decide to have only green and type 2, the program will display:
 only channel G

pic1.bmp : av.size=5.72121 cells=633

end
and we will get the following picture:
_followed by the name of the input file. In our case it will be
_pic1.bmp.
The meaning of the printed numbers is the following. av.sizestands for the average diameter of cell, here it was about 6 pixels.
cellsis the number of counted cells - this is what we are really looking for. These data will be also saved to a file named
counting.dat. It consists of two lines with program parameters, and then goes the result of counting:
# number 	diameter 	pixels 	av. bright. 	name

633		5.72121		18212	25	        pic1.bmp
number is the number of cells, diameter is the same as av. sizeabove, the two next columns are for us unimportant, and the last one is the name of file.
The same output can be produced simpler, when the channel is given explicitely when invoking the command:
> count.exe -m 2 pic1.bmp
where the number 2 means as before that only the green channel should be taken into account. When the option -m
is given,
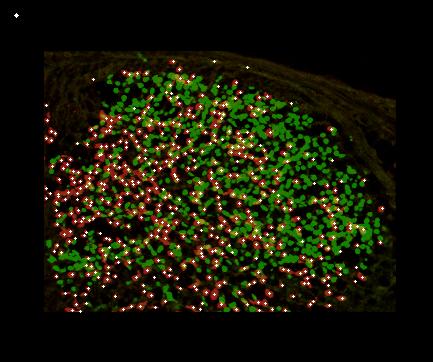
the program does not ask about the channel and starts immediately. To calculate the number of red cells, we type:
> count.exe -m 2 pic1.bmp (now press enter, and see...)
PROGRAM count: only channel R

pic1.bmp : av.size=5.51128       cells=463


end
and the picture looks now a bit different:
Now we shall face with something more complicated: we wish to count yellow (green+red) cells in the following picture:

> count.exe -m 3 pic2.bmp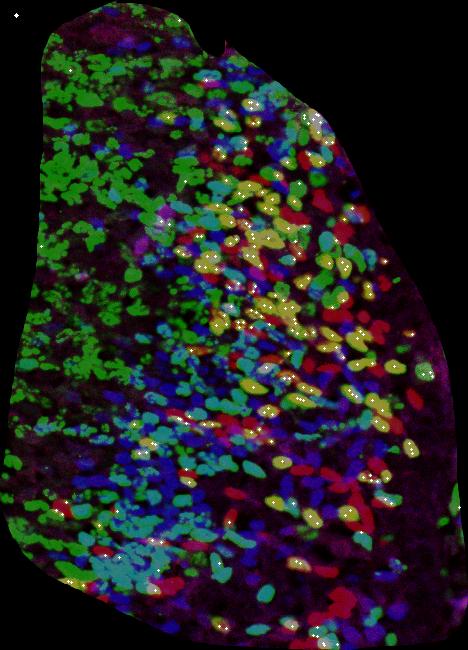
> count.exe -m 3 -b 80 -D 10 -S 4 pic2.bmp
Now I shall demonstrate how some options affect the program behavior. Our source file is shown below and we want to count blue cells:

>count.exe -m 4 ex3.bmp

PROGRAM count: only channel B

ex3.bmp : av.size=7.23069        cells=411

>count.exe -m 4 -b 150 ex3.bmp

PROGRAM count: only channel B

ex3.bmp : av.size=4.40809        cells=391

>count.exe -m 4 -S 10 ex3.bmp

PROGRAM count: only channel B

ex3.bmp : av.size=7.23069        cells=352

>count.exe -m 4 -D 10 ex3.bmp

PROGRAM count: only channel B

ex3.bmp : av.size=7.23069        cells=244

width) is set to 10 pixels:
>count.exe -m 4 -w 10 ex3.bmp

PROGRAM count: only channel B

ex3.bmp : av.size=10     cells=233
